Best Practices
How To's
How to Use Student Groups on Facebook to Boost Connection & Learning

If you want to improve learner satisfaction and build the community around your program, student groups on Facebook are a good place to start. Not only do they offer a social forum, they also give you a direct line to what students are thinking and talking about. Whether you’re teaching theater or offering Certified Nursing Assistant training, groups can offer students a more positive experience.
You’re probably already using Facebook for some of your social media marketing. That means you have a business page for your program. Starting a group is an easy next step. But before we show you how to use Facebook groups for students, let’s take a closer look at why you should.
The benefits of student groups on Facebook
Why are facebook groups important for your students? Facebook groups give students a social forum. Social connections improve learning, but it’s hard to connect in online classes. Even in-person classes may not offer many chances for students to get to know each other.
Research shows that Facebook groups can improve learning by promoting a sense of connection. Connected students help each other learn. They encourage each other when things get tough. That leads to better courses and happier, more connected students.
Left to their own devices, students might decide to connect on their own. If they do, instructors and course organizers are likely to be left out of the community.
- Learners might pass around mistaken beliefs or false information.
- Complaints can fester and grow outside your view.
- Compliments go unheard.
Even without these benefits, it would be worth having one just to make sure you stay in the loop. The administrator sets the rules. They choose who is invited to join. Being the admin of a Facebook group attached to your classes helps you control your brand.
Why start student groups on Facebook
Facebook isn’t the only forum available. If most of your students are professionals working in corporate settings, LinkedIn groups might be the right choice. For everyone else, Discord and Slack both offer closed spaces where people can connect.
Of these, Facebook is likely to be most familiar to most people. Just over 70% of internet users had a Facebook account in 2021.
While Facebook measures its daily active users in the billions, LinkedIn has about 645 million users with no data on how many check the app daily. Discord only has about 300 million daily active users. and Slack has about 12 million.
Some of your students may never have heard of these platforms. Those who have might think of Slack as a work tool and Discord as something for kids and gamers. Whatever their feelings about the Facebook platform, many people have at least a basic understanding of how it works.
How to start student groups on Facebook
Creating a group on Facebook is fairly straightforward. It’s a good idea to create it from your business page so your program shows up as the Admin.
How to Start a Facebook Group
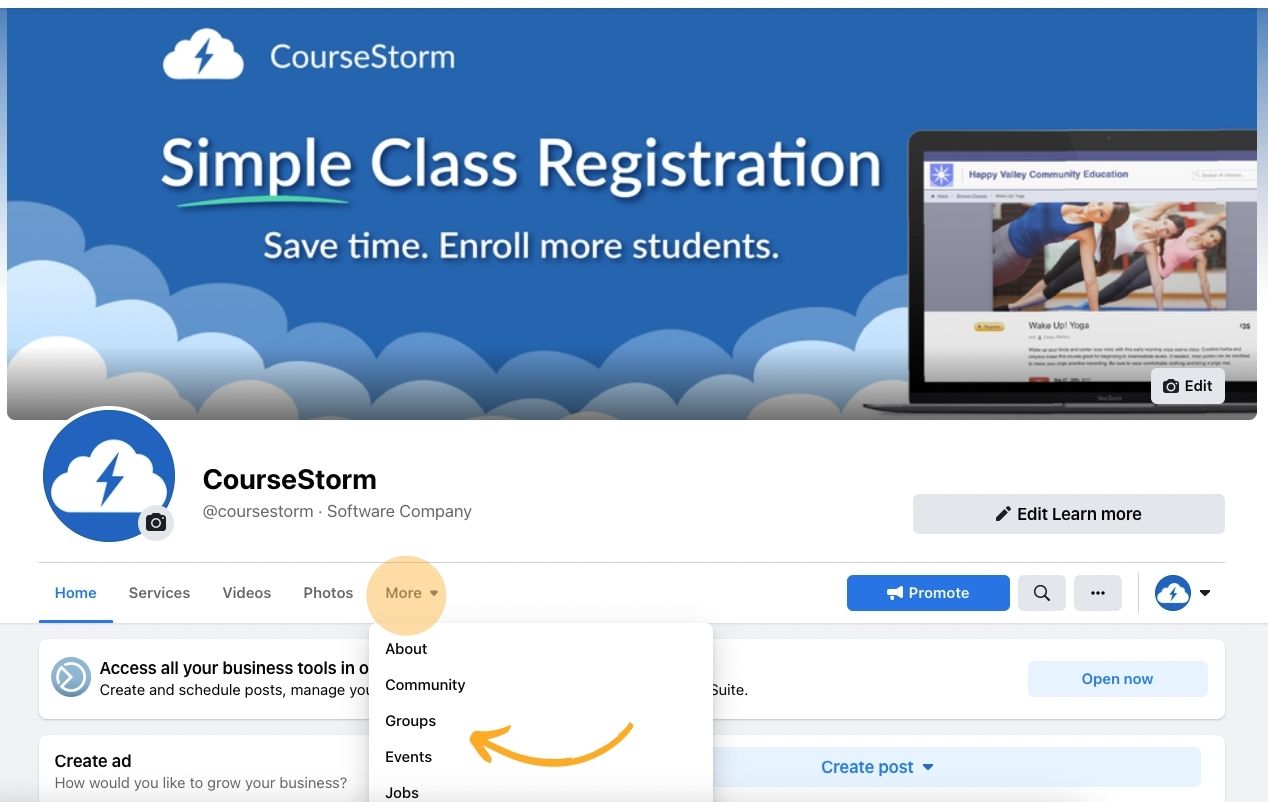
- Go to your business page on Facebook.
- Under your banner and profile picture, you’ll find a more button. Click it.
- Select “groups.”
- You’ll see two options: “link group” and “create linked group.” Click “create linked group.”
- Fill in a name. Choose something that students will easily recognize like “name of class – Spring 2022”
- In the choose privacy field select “private.” Posts in a private group are hidden from outsiders.
- You’ll get two more options: “visible” and “hidden.” Click “hidden,” this will prevent people outside the class from seeing or interacting with group posts.
- Don’t invite members yet. You want to add some images and rules first.
- Click “create.”
Next you’ll want to adjust some settings to create the best possible environment for student interaction.
Settings for student groups on Facebook
From the Manage group menu on the left side of your screen, click the “settings” option. You’ll find areas to add details and information. You can fill these out soon, but first, scroll down to the section marked “manage membership.”
Set “who can approve member requests” to “only admins and moderators.” This will prevent people from inviting users who aren’t on your class roster.
It’s smart to have at least one other person to help you administer or moderate the group. This could be the instructor, program director, a student volunteer, or a member of your admin team. Note that the person must have liked your Facebook page before you can add them as a group member.
How to add an admin or moderator
- Click the blue “invite” button on the top right of your group page
- Select the person or people you want to add.
- Click “send invites”
- After that person accepts the invitation you can invite them to be an admin or moderator. Go to your members tab.
- Find the person you want to add as an admin or moderator and click the three dots next to their name.
- Select “add as admin” or “add as moderator”
One last thing before you invite people. Make sure you establish some rules.
Rules for student groups on Facebook
- From the “manage group” menu click “group rules”
- Select the “get started” button
- Add rules. Facebook will give you a few example rules to use or you can write your own.
The rules should be similar to the ones in class. Consider including details about respect, courtesy, and what should not be shared.
Tips for Using Facebook groups
The best-case scenario is that students are engaged and the group takes on a vibrant life of its own. You might need to jumpstart the group for this result.
Start by posting class information. You might introduce the instructor or add a syllabus. Then start asking questions. Make sure they’re open-ended but not too broad to answer quickly.
Broad: What did you learn in class today?
Focused: What’s one fun fact you learned during our conversation about grant writing today?
What to post in student groups on Facebook
You should post daily to keep the conversation going.
- Share sources related to class discussions
- Spread information about local events
- Post pictures or videos from class and invite students to do the same
- Tell students about upcoming classes
- Ask for feedback
- Invite students to ask questions
Facebook groups are places to connect. They shouldn’t be just a virtual bulletin board where you post announcements. Invite students to interact, instead.
Monitor conversations to create a safe and respectful environment for everyone, but don’t try to control everything. Facebook groups work best when the students take the reins.
More to Learn
For more on how to use social media platforms for organic reach and community building, check back soon. We’re in the midst of a series on how to use Facebook, Instagram, TikTok, and Linkedin for education programs. Our blog post on social media metrics will help you track the results of your efforts.
Of course, you can only build a community if students sign up for your classes. That’s where CourseStorm comes in. Our impossibly simple course registration software makes registration easy.

Nic Lyons
Nic is skilled in scaling start-up edtech and education organizations to growth-stage success through innovative marketing. A former journalist and copywriter, Nic holds a postgraduate certificate in digital and print publishing from Columbia University School of Journalism's publishing course.